Gort's Proton Pack (Combustion Backpack Launcher) + Videos!
Posted: Mon Mar 06, 2006 8:40 pm
Well here it is guys, the "Proton Pack" (Think Ghostbusters) AKA: CBPL (Combustion Backpack Launcher). There's been a lot of hype about this launcher and I hope it lives up to what everyone has been expecting/hoping.
First of all I want to thank Mr. Plow for all his input on this launcher and many other things. I'd like to thank Darth Tater (Spudtech) for inspiring the original concept of the backpack combustion many many months ago in the middle of the night while we were quite delerious and came up with some very off-the-wall stuff. I'd lastly like to thank the many many other people who were there to go over all sorts of other details and suggest things to me.
My objective was to come up with a combustion backpack lanucher (no others exist) that was easy to operate, offers fast potato breech loading, fast venting and fueling, and interchangeable barrels.
<img src="http://www.spudfiles.com/uploader/uploadFiles/cbpl5.jpg">
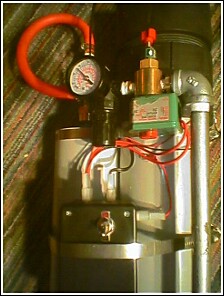
The gun uses a 24 volt solenoid actuated 3-way valve meter pipe, matress inflator (check valve inside chamber), 12v mixture fan, stun gun ignition, and rechargeable batteries (recharges without opening the box). This chamber is mounted to the back and has a hose that attaches to the bottom and leads to the barrel.
<img src="http://www.spudfiles.com/uploader/uploa ... .jpg"><img src="http://www.spudfiles.com/uploader/uploadFiles/cbpl2.jpg">
<img src="http://www.spudfiles.com/uploader/uploa ... .jpg"><img src="http://www.spudfiles.com/uploader/uploadFiles/cbpl4.jpg">
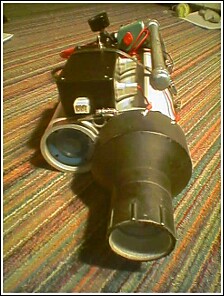
The CBPL barrel system took a lot of thought. To my knowledge nothing quite like this has ever been done before. The controls are located right on the handle. The tiny switch above the red button on the handle controls everything. Up is solenoid and blower on. Down is fan on and stun gun ready. The button controls the final step of the stun gun. There are 2 on/off switches on the gun. One is on the chamber and one is on the back of the barrel track. Both must be on for it to operate.
<img src="http://www.spudfiles.com/uploader/uploadFiles/cbpl7.jpg">
<img src="http://www.spudfiles.com/uploader/uploa ... .jpg"><img src="http://www.spudfiles.com/uploader/uploadFiles/cbpl6.jpg">
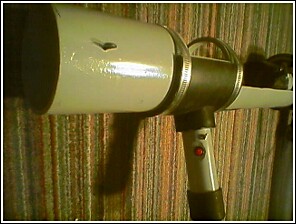
What goes on here is that the hose connects to the elbow, bypasses the bell reducer and goes right into a female 2" cam-loc. The reducer holds the 4" pipe to the 2". This 4" pipe is basically a track for the barrels to slide in.
The secret to this is that 3" fitings fit inside 4" pipe. So an insert was made from a 3" coupler with a bushing on each side of it that fits in the front of the track and is clamped in place with a small wing screw. The bushings were hollowed out a little to allow the barrel that fits inside it to slide freely. This barrel then has a male cam-loc fitting on the end of it which locks into the female end. I have 3 inserts that allow for 2", 1.5", and 1.25" barrels. I will be making 2.5" and 3" ones soon.
<img src="http://www.spudfiles.com/uploader/uploa ... cbpl14.jpg">
So here's the cool part of the loading:
<img src="http://www.spudfiles.com/uploader/uploadFiles/cbpl9.jpg">
<img src="http://www.spudfiles.com/uploader/uploa ... .jpg"><img src="http://www.spudfiles.com/uploader/uploa ... cbpl11.jpg">
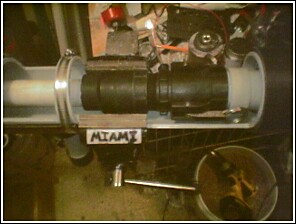
And here's the golf ball barrel on it:
EDIT: I also got the pipes for my GB barrel from my most favorite forum member, Pimpmann22...
<img src="http://www.spudfiles.com/uploader/uploa ... .jpg"><img src="http://www.spudfiles.com/uploader/uploa ... cbpl13.jpg">
After the countless hours and money spent and/or wasted on this I hope this launcher proves to be pretty good. I will do more testing and video soon.
Edit: New pictures with new electric box and LED fan:
<img src="http://www.spudfiles.com/uploader/uploa ... .jpg"><img src="http://www.spudfiles.com/uploader/uploa ... bplfan.jpg">
Edit: Newer pictures with shoulder straps mounted:
<img src="http://www.spudfiles.com/uploader/uploa ... .jpg"><img src="http://www.spudfiles.com/uploader/uploa ... cbpl22.jpg">
<img src="http://www.spudfiles.com/uploader/uploa ... .jpg"><img src="http://www.spudfiles.com/uploader/uploa ... cbpl24.jpg">
VIDEOS!
<a href="http://www.spudfiles.com/forums/dload.p ... &">Loading and Controls Video</a>
<a href="http://www.spudfiles.com/forums/dload.p ... 1&">Firing Video</a>
<a href="http://www.spudfiles.com/forums/dload.p ... >Auto-Feed Golf Ball Barrel</a>
First of all I want to thank Mr. Plow for all his input on this launcher and many other things. I'd like to thank Darth Tater (Spudtech) for inspiring the original concept of the backpack combustion many many months ago in the middle of the night while we were quite delerious and came up with some very off-the-wall stuff. I'd lastly like to thank the many many other people who were there to go over all sorts of other details and suggest things to me.
My objective was to come up with a combustion backpack lanucher (no others exist) that was easy to operate, offers fast potato breech loading, fast venting and fueling, and interchangeable barrels.
<img src="http://www.spudfiles.com/uploader/uploadFiles/cbpl5.jpg">
The gun uses a 24 volt solenoid actuated 3-way valve meter pipe, matress inflator (check valve inside chamber), 12v mixture fan, stun gun ignition, and rechargeable batteries (recharges without opening the box). This chamber is mounted to the back and has a hose that attaches to the bottom and leads to the barrel.
<img src="http://www.spudfiles.com/uploader/uploa ... .jpg"><img src="http://www.spudfiles.com/uploader/uploadFiles/cbpl2.jpg">
<img src="http://www.spudfiles.com/uploader/uploa ... .jpg"><img src="http://www.spudfiles.com/uploader/uploadFiles/cbpl4.jpg">
The CBPL barrel system took a lot of thought. To my knowledge nothing quite like this has ever been done before. The controls are located right on the handle. The tiny switch above the red button on the handle controls everything. Up is solenoid and blower on. Down is fan on and stun gun ready. The button controls the final step of the stun gun. There are 2 on/off switches on the gun. One is on the chamber and one is on the back of the barrel track. Both must be on for it to operate.
<img src="http://www.spudfiles.com/uploader/uploadFiles/cbpl7.jpg">
<img src="http://www.spudfiles.com/uploader/uploa ... .jpg"><img src="http://www.spudfiles.com/uploader/uploadFiles/cbpl6.jpg">
What goes on here is that the hose connects to the elbow, bypasses the bell reducer and goes right into a female 2" cam-loc. The reducer holds the 4" pipe to the 2". This 4" pipe is basically a track for the barrels to slide in.
The secret to this is that 3" fitings fit inside 4" pipe. So an insert was made from a 3" coupler with a bushing on each side of it that fits in the front of the track and is clamped in place with a small wing screw. The bushings were hollowed out a little to allow the barrel that fits inside it to slide freely. This barrel then has a male cam-loc fitting on the end of it which locks into the female end. I have 3 inserts that allow for 2", 1.5", and 1.25" barrels. I will be making 2.5" and 3" ones soon.
<img src="http://www.spudfiles.com/uploader/uploa ... cbpl14.jpg">
So here's the cool part of the loading:
<img src="http://www.spudfiles.com/uploader/uploadFiles/cbpl9.jpg">
<img src="http://www.spudfiles.com/uploader/uploa ... .jpg"><img src="http://www.spudfiles.com/uploader/uploa ... cbpl11.jpg">
And here's the golf ball barrel on it:
EDIT: I also got the pipes for my GB barrel from my most favorite forum member, Pimpmann22...
<img src="http://www.spudfiles.com/uploader/uploa ... .jpg"><img src="http://www.spudfiles.com/uploader/uploa ... cbpl13.jpg">
After the countless hours and money spent and/or wasted on this I hope this launcher proves to be pretty good. I will do more testing and video soon.
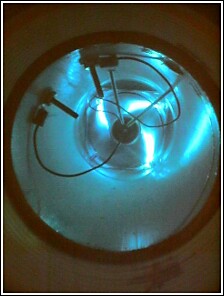
Edit: New pictures with new electric box and LED fan:
<img src="http://www.spudfiles.com/uploader/uploa ... .jpg"><img src="http://www.spudfiles.com/uploader/uploa ... bplfan.jpg">
Edit: Newer pictures with shoulder straps mounted:
<img src="http://www.spudfiles.com/uploader/uploa ... .jpg"><img src="http://www.spudfiles.com/uploader/uploa ... cbpl22.jpg">
<img src="http://www.spudfiles.com/uploader/uploa ... .jpg"><img src="http://www.spudfiles.com/uploader/uploa ... cbpl24.jpg">
VIDEOS!
<a href="http://www.spudfiles.com/forums/dload.p ... &">Loading and Controls Video</a>
<a href="http://www.spudfiles.com/forums/dload.p ... 1&">Firing Video</a>
<a href="http://www.spudfiles.com/forums/dload.p ... >Auto-Feed Golf Ball Barrel</a>
