my first cannon- propane fueled w/ spark plug ignition

Boom! The classic potato gun harnesses the combustion of flammable vapor. Show us your combustion spud gun and discuss fuels, ratios, safety, ignition systems, tools, and more.
turbocoop
Private
Private
Posts: 3
Joined: Tue Jan 01, 2008 8:15 pm

Tue Jan 01, 2008 9:09 pm

I was bored one weekend so I started looking up potato cannons online and drew up some plans and heres what I came up with-
Its made entirely out of black ABS pipe, the barrel is 3" pipe and about 5' long. The combustion chamber is 4" pipe cut into little pieces and cemented together with 4" couplings so its actually double walled for more strength. The end of the combustion chamber has a schrader valve to fill it and blow it out after each shot, and I put in a little air compressor water drain valve to open and let air out when stuffing a potato down the barrel. I bought a bunch of metal tubing and welded up the stand too, it feels pretty sturdy. I hate math so I didnt really calculate anything, I just went with my little picture I drew up and Im hoping it works- I havent fired it yet. I spent about $160 total on everything, ABS, coil + plug, metal, paint, fittings...

The ignition is just a $10 auto ignition coil and a spark plug wire I had laying around, with a spark plug in the combustion chamber. It sparks when I touch the wire leads to a 12v car battery so I know that works, the spark doesn't seem as big as I thought it would be though... heres some pics
Image
Image

Heres my questions since Ive never done this before:
1.Has anyone built anything similar to this? -and how did it work out?
2.What should I do first when putting propane in it, start with a little and see how it fires, then increase the amount 'til it shoots the best?
3.Can anyone see anything wrong with it that I might want to change before I fire it for the first time?

Thanks for looking
carter
Private 4
Private 4
Posts: 77
Joined: Mon Mar 05, 2007 2:47 am

Tue Jan 01, 2008 9:31 pm

i cant see anything to wrong with it. you might want to make a propane meter. you can wiki or search it. different ignition. say a bbq lighter or stun gun
At my lemonade stand I used to give the first glass away free and charge five dollars for the second glass. The refill contained the antidote
cwazy1
Specialist 3
Specialist 3
Posts: 305
Joined: Mon Sep 10, 2007 8:31 pm

Tue Jan 01, 2008 9:35 pm

wow man 160$ can get you an onboard propane system cannon.

1. a schrader valve will NOT air it out fast at all. adn you have to haul around a compressor. should have just put a fan in there.
2. you wasted alot of money on cutting the chamber and putting couplings on it.
3. you should build a propane meter. if not, just guess and check. but imho, and not to offend or anything, that is absolutly terrible and quite a waste of money. i could make what you have for like 40$ with just a simple spray and pray.

you should have done research on this before spending 160$.
I bought a signature twice because I was an idiot. 600 bux =(
sandman
Corporal 2
Corporal 2
Posts: 672
Joined: Thu Mar 15, 2007 6:59 pm

Tue Jan 01, 2008 9:44 pm

i would add a support between the chamber and the barrel because there is alot of stress on the elbows that way it is set up
User avatar
rna_duelers
Staff Sergeant 3
Staff Sergeant 3
Posts: 1739
Joined: Mon Sep 26, 2005 7:07 am
Location: G-land Australia

Tue Jan 01, 2008 9:51 pm

I like it!Just give it a go with the spray n pray,is there a clean out cap on it?If there isn't you should cut the fitting off and put one on.That way you can clean the chamber easily.

Go a head and fire it,first spud out of a gun is always great.
Image
Killjoy
Sergeant
Sergeant
Posts: 1052
Joined: Sun Nov 12, 2006 12:51 am
Location: New Mexico

Tue Jan 01, 2008 10:51 pm

Wow for your first spudgun that looks pretty good, and I really like the stand. And just ignore cwazy1 and his complaining about the cost, I'm not sure why he is whining, personally as long as it looks good (and works) it doesn't matter how much money you spend.

As of now I'd try pray and spray and the power should be decent. You may want to consider upgrading to a check valve and a fan for venting and a propane meter, though if you start putting schrader valves on your future combustion cannons you'll only have to put an air chuck on you propane meter and then you can make one to be used with multiple cannons and save some dough (you'll just have to vary the pressure to get the right mix).

Anyways looks good and good luck, hope you stick around.
Stanford Class of 2012

"In the end our society will be defined not only by what we create, but what we refuse to destroy"- John Sawhill
TurboSuper
Corporal 5
Corporal 5
Posts: 986
Joined: Thu Jun 16, 2005 1:44 pm
Been thanked: 1 time

Tue Jan 01, 2008 11:05 pm

Well i'd definitely reccomend adding a chamber fan because it increases cannon reliability, but other than that, nice work :D
"If at first you dont succeed, then skydiving is not for you" - Darwin Awards
User avatar
hi
Staff Sergeant 2
Staff Sergeant 2
Posts: 1619
Joined: Thu Feb 01, 2007 9:28 pm

Tue Jan 01, 2008 11:06 pm

that is a nice gun, especially for a first, but you need to put a support between the barrel and the chamber, it causes to much stress on the fittings and it will eventually break if you dont.
"physics, gravity, and law enforcement are the only things that prevent me from operating at my full potential" - not sure, but i like the quote

you know you are not an engineer if you have to remind yourself "left loosy righty tighty"
User avatar
mark.f
Sergeant Major 4
Sergeant Major 4
Eritrea
Posts: 3638
Joined: Sat May 06, 2006 11:18 am
Location: The Big Steezy
Has thanked: 58 times
Been thanked: 60 times
Contact:

Donating Members

Wed Jan 02, 2008 12:10 am

Nice first cannon. The idea with the couplers on the chamber wasn't really necessary, but if it makes you feel safer then ROCK ON!!!

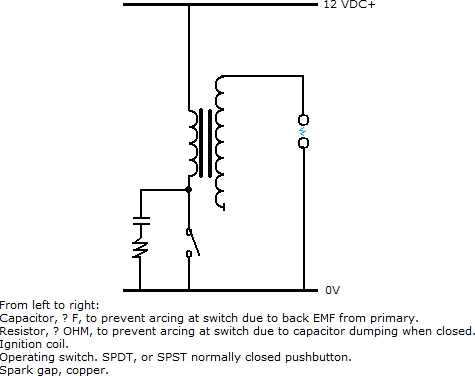
I have one comment on the ignition coil. If you were to hook up a switch between the ground side of the coil and the negative lead of the battery, you could switch the coil on, (to build the magnetic field through the ferrite core), and then switch it off, to collpapse the field and then generate the voltage spike across the secondary. In your current configuration, I believe you are just using the initial, relatively low voltage spike that occurs when the power source is switched on to the primary for making your spark. You can also install a small capacitor and resistor in addition to the switch to prevent welding of the contacts due to back EMF. Here's a simple diagram showing a manually switched ignition coil:

<div align="center">Image</div>

Other than that, I would just suggest the barrel support, although as long as your chamber doesn't weigh too much, it might not be that big of a problem.

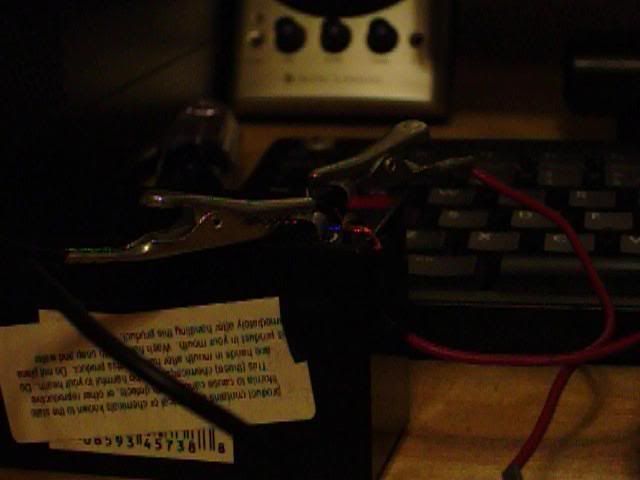
EDIT: Here's a still of a small Nissan coil arcing to ground when switched off with a simple toggle switch, (no cap to prevent welding). Are your sparks longer or shorter than this?

<div align="center">Image</div>
User avatar
jrrdw
Moderator
Moderator
United States of America
Posts: 6572
Joined: Wed Nov 16, 2005 5:11 pm
Location: Maryland
Has thanked: 39 times
Been thanked: 22 times
Contact:

Donating Members

Wed Jan 02, 2008 6:32 am

Mark the spark in the pic is very hard to judge with, it's hard to see. I would go with a momentary switch to fire it. As in any coil genarated spark system, the spark plug fires as soon as you break the circuit. Push button bang, hot dam! A brace between the chamber and barrel is a winning bet. Welcome to Spudfiles.

Get a video of the first shot if you can, we/I love to check them out.
User avatar
rna_duelers
Staff Sergeant 3
Staff Sergeant 3
Posts: 1739
Joined: Mon Sep 26, 2005 7:07 am
Location: G-land Australia

Wed Jan 02, 2008 7:06 am

Nail on the head there jrrdw,a brace between the barrel and chamber would go well.

Don't be afraid to add pictures of your first spud flying through the air.
Image
turbocoop
Private
Private
Posts: 3
Joined: Tue Jan 01, 2008 8:15 pm

Wed Jan 02, 2008 7:23 am

My spark is about the same as the one in your pic Id say, but I cant see very well. Ill try putting a switch on it, that makes sense. As far as the chamber fan goes- I do still have the clean out cap on the end so I guess I could blow it out that way, I just thought it would work with compressed air.

One more thing- I didnt cement the barrel into the fitting at the bottom yet, cause I wanted it to be removable so I can transport it easier. Would that hold up at all when shooting it? I have 2 screws in it going through the fitting and the barrel that hold it in and also stop anything I load from going in too far.

What would be the best thing to use for supports between the chamber and barrel? Just a piece of wood with notches cut to fit?

Thanks for all the replies too
User avatar
rna_duelers
Staff Sergeant 3
Staff Sergeant 3
Posts: 1739
Joined: Mon Sep 26, 2005 7:07 am
Location: G-land Australia

Wed Jan 02, 2008 7:26 am

The barrel will fly out if you do not cement it into place,even poor joins can fail and have a barrel fly out.

Piece of wood with some notches works fine,but try and stick with a theme.Seeing as all of your cannon is black make the support black so you get a nice looking clean gun.
Image
TurboSuper
Corporal 5
Corporal 5
Posts: 986
Joined: Thu Jun 16, 2005 1:44 pm
Been thanked: 1 time

Wed Jan 02, 2008 9:06 am

Screws will hold the barrel in place, but there's really no substitute for cement. Since you were safety-concerned enough to double-wall your chamber with couplers, use threaded adapters and cement to make your barrel removeable.
"If at first you dont succeed, then skydiving is not for you" - Darwin Awards
User avatar
mark.f
Sergeant Major 4
Sergeant Major 4
Eritrea
Posts: 3638
Joined: Sat May 06, 2006 11:18 am
Location: The Big Steezy
Has thanked: 58 times
Been thanked: 60 times
Contact:

Donating Members

Wed Jan 02, 2008 11:17 am

@jrrdw: the spark in the picture was created when opening the switch. No spark occurred with that size gap when closing the switch.

@turbocoop: if you use a pushbutton like jrrdw said, I would recommend the cap/resistor setup to keep it from welding shut and ruining the switch. My friend and his dad even went as far as using a pushbutton wired to a small power transistor to switch the coil, with the cap and resistor protecting the transistor.
Post Reply