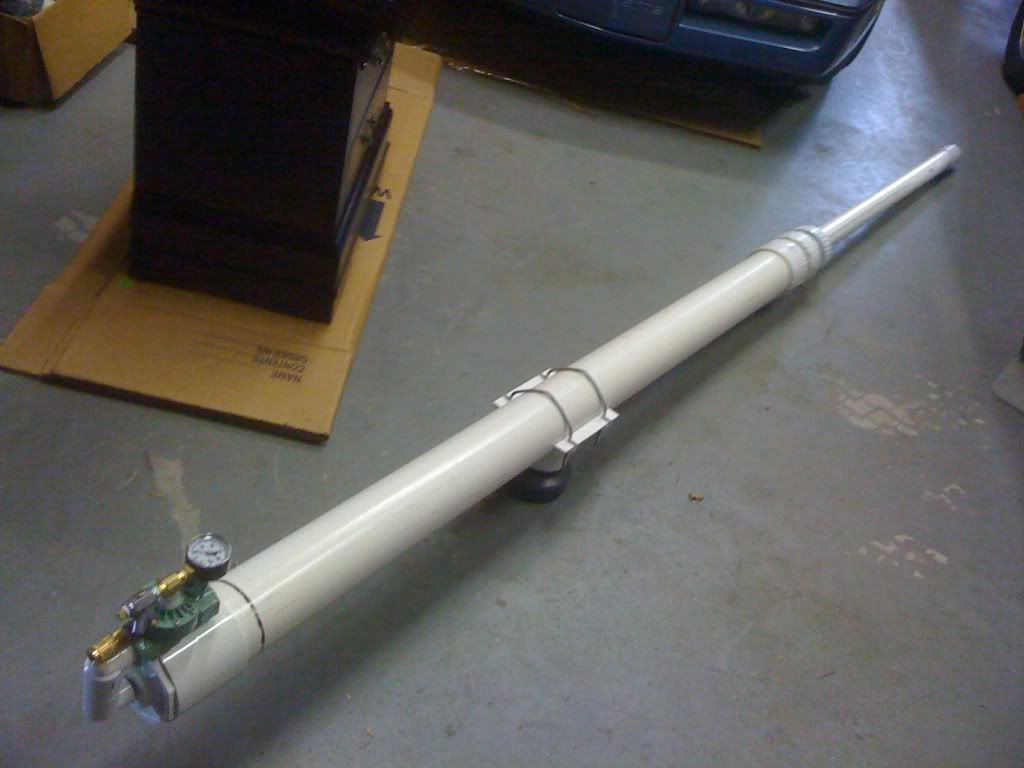
8ft Coaxial Shoulder Launched Golfball Cannon.
So I've been on this site for a long time now, but I was mainly a lurker as I never felt I had much of a cannon worth posting, so I'll make this both my introductory post, as well as a post about my newest gun.
A little of my previous Spudgun history. I've always been into Pneumatics. I just like them a lot, so thats all I've ever made. I might make a hybrid next, who knows.
But anyway, my first cannon was a steel pipe and PVC cannon, with a half inch ball valve and a shrader valve to fill the thing. I made this when I was about 12, before I even knew this website existed, or before I had ever seen plans for such a device anywhere. It was more a 12 year old being curious and wanting to experiment, so I built that thing. It would shoot markers (the kind you write with) around 100 yards, and marbles clean out of sight. (never found any of them again to verify distances) It leaked like crazy, and was generally a mess, but I learned a lot from it.
The next cannon I built was basically a bigger version of the first. All threaded steel pipe tank construction, with a metal shrader valve, a 1 1/2 inch ball valve, and a 1.5 inch sch. 40 barrel for potatoes. I used JB weld in the metal pipe threads to permanently seal it up, and from day one it never leaked even a bit. Put 100psi in it one night, and the next morning you'll still have 100PSI in it. It was a lot of fun, and would still launch stuff pretty unreal distances due to the high pressures I could take it too, as well as learning to open up that ball valve as quickly as possible (i would stand up and kick it upen with my foot.) Ice slugs and frozen water balloons were lots of fun to shoot!
This is the cannon as of today, with two barrels. One is the 5ft 1.5" Sch. 40 Barrel, and the other is a 7ft 1.5" SDR 21 GolfBall Barrel.
Then when I was 15, I moved to Northern Ireland, where spudguns and such are generally frowned upon, which is understandable considering the sensitivity of that area to guns, bombs, and other such weapons. So my spudgunning stopped for 3 years, but in that time I was planning. Yea, you should never let me contemplate such devices for so long! By the time I moved back to America about 9 months ago, I knew exactly what I wanted to build the moment I hit US soil!
I wanted something BIG, I wanted it to be fired from the Hand or the Shoulder, and I wanted it to shoot golfballs since they're pretty cheap and designed for flight! I also wanted a piston cannon since that's pretty much the gold standard of reliable, powerful, and easy to use, pneumatic valveage!
So a few weeks of drawing, sketching, and thought later, I had in mind exactly what I wanted to make.
The specs are this:
-7ft SDR 21 golfball barrel sleeved in 2" Sch. 80 for strength (its only sleeved inside the cannon)
-6ft air tank, made of 4" pressure rated PVC
-The whole cannon is right at 8ft long when assembled.
-Plywood and foam piston, with a rubber sealing face. (foam keeps the piston lightweight)
-1/2 thick open cell foam, cut into a circle and glued to the back of the cannon as a piston bumper. Very effective, you hardly hear the piston hit at all!
-Modified 1" sprinkler valve for quick and easy actuation of the piston. The sprinkler valve is modified for pneumatic actuation, and i've also removed the spring, which causes it to open faster, and for a slightly longer period of time.
-Quick disconnect with 1/4" ball valve for filling the cannon directly from an air compressor.
-125 PSI pop off valve to prevent over pressurization of the components for safety.
-Pressure gauge for accurately determining pressure.
I originally wanted to hold off on revealing the cannon until I was completely finished with it, i.e. paint, stock, and possibly a scope for accuracy, however I decided to just go ahead and show it in its unfinished, but operational state.
So with that behind, here are some pictures:
This is a picture of all the parts laid out before final assembly
The Piston, Barrel, and Tank before assembly.
Same as above, plus the blowgun trigger, and sprinkler valve trigger/ fill valve assembly.
Tank, and barrel, with the SDR21 protruding from the 2" Sch 80 it is sleeved in.
Valve assembly with foam bumper.
Blow gun trigger.
This is the Piston. Its very light for its size due to the foam used.
I cut the plywood and foam out using a dremel circle cutter attachment. The gasket I cut out by hand, and then sanded the edge smooth so that it sealed perfectly inside the gun.
A small bolt holds the whole thing together.
So you'd like video? 8)
[youtube][/youtube]
That shot was at 50 PSI. The gun will work at very low pressure, below 10PSI in fact. The piston moved so nicely in the 4" PVC, that with the sprinkler valve unscrewed from the back of the cannon, I could blow the piston forward and then suck it back with my mouth. It will easily put a golfball through plywood at 20PSI from about 25 yards (same place as the shot in the video)
According to GGDT, at 125PSI, this gun should launch a golfball around 610 ft/s.
Anyway, questions, comments and suggestions are all appreciated!
Last edited by Mtrhd0024 on Wed Mar 24, 2010 7:15 pm, edited 1 time in total.
- spudtyrrant
- Corporal
- Posts: 550
- Joined: Fri Jan 02, 2009 6:10 pm
Nice job, that coax come out almost perfect.
The only problem you have is the clean-out cap you used isn't pressure rated, I would replace it with either a sch 80 cap or cascading fittings, but other than that very nice job hope to see more from you.
While I agree that technically yes its not pressure rated, its been modified and beefed up so much now that I feel comfortable running it for pressure.spudtyrrant wrote:Nice job, that coax come out almost perfect.
The only problem you have is the clean-out cap you used isn't pressure rated, I would replace it with either a sch 80 cap or cascading fittings, but other than that very nice job hope to see more from you.
Basically what I ended up doing is drilling a 1 1/4" hole through the end of the "square nub" (don't know how else I would describe it) on the cleanout cap, and then fitting a 1" threaded fitting through the hole from the inside of the cap. Then I used a special plastic epoxy to fill in the surrounding area between the inside of the square on the cleanout cap, and the round plastic threaded fitting so that it was airtight. Then I cut a short piece of 1" PVC and fitted it into that threaded fitting so that it was flush with the inside edge of the cleanout cap. From there I filled the entire inside of the cleanout cap with two part epoxy. That made a flat surface that the foam bumper was then glued too. So basically what i've now got is a solid plastic cleanout cap with a "threaded nipple" on the end of it that my sprinkler valve screws onto.
I'm not sure if that description makes any sense, but I'll attempt to do a drawing later on which would demonstrate it a bit better. The cleanout cap is the only part which is not pressure rated, but again, its now so heavily modified that I'm confident it will take the pressure. I've seen others run cleanout caps unmodified under pressure, so this one should be good to go! :thumbright:
- clemsonguy1125
- Sergeant 5
- Posts: 1485
- Joined: Tue Jul 21, 2009 4:00 pm
- Location: East Coast
Great job, Its really clean, only thing Id suggest is to paint it flat black
Thanks! Its going to get a stock to hold the blow gun and trigger assembly in place, as well as make it easier to hold. After that, I'll likely paint the entire thing! I'm also going to add a Sch 80 muzzle break, and hopefully some sights!clemsonguy1125 wrote:Great job, Its really clean, only thing Id suggest is to paint it flat black
-
- Staff Sergeant
- Posts: 1596
- Joined: Fri Dec 15, 2006 3:57 pm
- Location: maryland
- Has thanked: 3 times
- Been thanked: 9 times
nice job man,
that shallow dwv cap is pretty weak so be careful, I've seen plenty those broken on this forum, your bumper and light piston look pretty good but nevertheless those cheap plugs have quite a reputation so any thing more you can do is probably still worth while
Thanks man, and yea I'm aware those things are pretty weak, I've seen pictures of them cracked and such, but that cap is heavily beefed up, and I'm running a really lightweight piston, so between that and the bumper, I don't think I'll have problems! The bumper is really really effective at slowing the piston impact, there is really no recoil at when doing a dry fire, so hopefully I'll not have any issues!iknowmy3tables wrote:nice job man,
that shallow dwv cap is pretty weak so be careful, I've seen plenty those broken on this forum, your bumper and light piston look pretty good but nevertheless those cheap plugs have quite a reputation so any thing more you can do is probably still worth while
I wore a face shield and eye protection for the first 10 or so shots with this thing, and then when I started taking the pressures higher I do the same, so I'm careful for sure!
I should have gotten pictures of the cap before I installed the bumper. Its really really stout. And I'm currently in college for mechanical and aeronautical engineering, so I'm aware I have to be careful and design this thing well!
- deathbyDWV
- Corporal
- Posts: 576
- Joined: Sat May 16, 2009 4:02 pm
- Location: Owasso, OK
Good job dude. Now go shoot some REALLY heavy ammo and see how the recoil is...
I wouldn't worry much about the end cap as long as as you don't stick your face in front of it while filling it
BTW welcome to spudfiles!
edit...
I made one alot like this in the past... i wouldnt shoulder fire it though it goes on a stand...
I wouldn't worry much about the end cap as long as as you don't stick your face in front of it while filling it
BTW welcome to spudfiles!
edit...
I made one alot like this in the past... i wouldnt shoulder fire it though it goes on a stand...
Last edited by deathbyDWV on Wed Mar 24, 2010 10:37 pm, edited 1 time in total.
Life's too short to mark off the items on your wish list...
Thanks man! I'm sure I'll be experimenting with different ammo shortly! And yea, I'm sure the recoil gets crazy when you go with heavy ammo. I should try a metal slug! I bet it would knock me clean over haha!deathbyDWV wrote:Good job dude. Now go shoot some REALLY heavy ammo and see how the recoil is...
I wouldn't worry much about the end cap as long as as you don't stick your face in front of it while filling it
BTW welcome to spudfiles!
I want to try some distance and damage shots, and I'll be sure to get it on video so you can all see!
I need to provide my GGDT file so ya'll can take a look and check my work, but i'm on a Mac, so I'd need to post the file from my sisters computer.
Anybody got an idea on how far a Golfball would go at 610ft/s as GGDT predicts? GGDT estimated a little over a quarter mile. I was kinda hoping for more I guess. But maybe thats what special darts are for!
And wasn't there like a plywood damage competition on here a while back, i.e. see how many layers of 1/2" ply you could shoot through in one shot? I'd love to try that with this thing and see how she'd do!
But yea, this thing ain't finished yet, this is only the first stage. It works, so now I can concentrate on ergonomics and aesthetics!
I realize this isn't a new design by any stretch of the imagination, I just wanted to make the biggest cannon possible, without sacrificing portability too badly. I don't think you could go much bigger than this before it would get too heavy, or before the recoil would be too much. Its already quite heavy (I'm guessing maybe 30lbs?) has quite a decent recoil over 80 PSI, and is awkward enough to maneuver through my house, being 8ft long!
And edit in response to your edit:
Sweet cannon, that thing is also huge!! Whats with all you girls and your stands to hold your cannons up!? haha just kiddin, I'm sure once I start shooting heavier stuff I may regret not building a stand! But if it comes to that then I'll see!
What are the specs on that thing? I'd like to see the thread (i just looked for it but couldn't find it) because I've never really seen another cannon like mine. I honestly didn't even really come on here for ideas, I just walked through a few hardware stores to get an idea of what I could buy locally, went home and thought about it, and then built mine as I pleased. I realize there will be a lot of people moaning about my DWV drain plug, but I carefully designed everything regarding that cap, and I think if they saw the actual design in person they'd realize that its substantially beefed up!
Last edited by Mtrhd0024 on Wed Mar 24, 2010 10:49 pm, edited 1 time in total.
- deathbyDWV
- Corporal
- Posts: 576
- Joined: Sat May 16, 2009 4:02 pm
- Location: Owasso, OK
I'd guess you'd get slightly more that 3/8 mile... Mine shoots a bouncey ball that far but its barrel is ten feet. Yours would make up for this by using golfballs.
Mine will also shoot clean through 2 sheets of 1/2 inch ply. I haven't tried more. (since ours have similar dimensions i'd expect very similar results)
Have fun and stay safe!
Mine will also shoot clean through 2 sheets of 1/2 inch ply. I haven't tried more. (since ours have similar dimensions i'd expect very similar results)
Have fun and stay safe!
Life's too short to mark off the items on your wish list...
Cool! What kinda velocity does GGDT predict your bouncy ball cannon to shoot at? Or have you run it through?deathbyDWV wrote:I'd guess you'd get slightly more that 3/8 mile... Mine shoots a bouncey ball that far but its barrel is ten feet. Yours would make up for this by using golfballs.
Mine will also shoot clean through 2 sheets of 1/2 inch ply. I haven't tried more. (since ours have similar dimensions i'd expect very similar results)
Have fun and stay safe!
And yea, as far as the plywood goes, I know it'll put a golfball through 1/2" at 20psi from 25 yards. I haven't tried any lower pressure than that, but it might do it, especially if i was closer. But if its really moving that ball at 610ft/s, id say it ought to go through several
I've got a car door that came off my dads truck years ago... and he's volunteered that for testing. So one of these days soon, i'll get a go at shooting that! I'd love to see a golfball go through a car door. Probably not likely, but it would be cool! (just need to watch for the ricochet!)
- deathbyDWV
- Corporal
- Posts: 576
- Joined: Sat May 16, 2009 4:02 pm
- Location: Owasso, OK
I had ggdt but my computor crapped out and ggdt was lost. Ever since then it won't let me download it. It just partially goes and then quits. And i built this cannon after...
I think it'll do thru the door...
Life's too short to mark off the items on your wish list...
I hope so!deathbyDWV wrote:I had ggdt but my computor crapped out and ggdt was lost. Ever since then it won't let me download it. It just partially goes and then quits. And i built this cannon after...
I think it'll do thru the door...
I'll defo be getting that shot on video!!
If it won't do it with a golfball, im positive it'll do it with a nice pointy metal slug of some sort!